Sunday, January 31, 2010

Garden Pond

For weeks I have been practically obsessing about my pond. I was looking at pictures on the Internet of life size and miniature ponds. I had found a tutorial a while back on how to do a goldfish for a pond and I was trying to find it again. I had set everything up on the side yard and tried to determine where the pond would go and where it would look most natural. The other day I purchased a bag of smooth river stones from Michael’s Craft Shop and looked around for something to use them with. Carved foam with aluminum foil? No. A paper cup? No.

Finally, I was looking around and found in the closet some oval cups that are to be used for dying eggs. They come in five colors and one of them was green. I say was because I ending up taking the green one and cutting it way down to about half an inch deep and gluing the stones around it. I think it turned out nicely. I then mixed some green and brown paint and coated the bottom of the cup so it wasn't so bright green and resembled the bottom of a pond. I made some pond grasses out of scrapbook paper, but I am not sure I am going to end up with them - they are just placed there for the picture. They may look okay in the pictures, but in real life I am not sure they look realistic.

Now I need to also find some resin to use for the water, grass for the side of the garden, and shrubbery for the garden part and some flowers too. I found an article in Dollhouse Miniature magazine on how to do daylilies with wire and paper and a blog entry for doing a shrubbery with flower foam, spray adhesive, and model railroad foliage, so I am going to do that as well. I also might get a trellis for the side of the house and get some flowers or vines to climb to go along with the smiling face on the side of the house. I have been trying, very unsuccessfully to make flowers out of Fimo clay but I am not very good at that at all (really horrible), so I am going to have to save for flowers and plants for the garden and get them piece meal. I read about using dried coffee ground and tea bag leaves for the soil so I am going to use that around the plants. I had some bricks leftover from doing the chimney on my first house, so I used them for lining the garden from the grass, which you can see in the second picture. I think it’s really coming along.

I was going to put a fish in it, but I can't find the tutorial and I am really very bad at doing the clay, so maybe I won't add that.  My son is very artistic, so maybe I can get him to do it. 
 
Once I get grass down and the shrubbery made I am going to secure the fence in place and then it should be quite complete and I can move on to the interior of the cottage.

Thursday, January 28, 2010

Under Roof

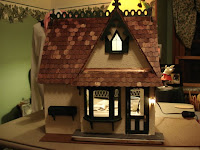
I finished shingling and staining the roof. I had to use a Q-Tip in order to get into the corners, but it was better than I thought it would be because I thought I was going to get stain all over the copper valleys. I think this really adds a lot to the outside and I am now going to start on the garden part of the house.


I don't know if you can see the brown board to the right of the house which will become the garden.  I have a white picket fence all ready to be put in place and start designing the space.

Welcome and Thanks

Thanks to my new follwer Susan at http://minicrochetmad.blogspot.com/.  Thanks for following me.  I hope you enjoy what you see.

Friday, January 22, 2010

Wonderful Invention


In looking through a catalog I noticed that there was a gadget that would convert a hanging light to a plug-in. I was intrigued as I was struggling with the chandelier in the cottage. The wire that I ran from the light to the tape was showing big time and the brads, even though they worked, were bulky looking. So I order one for the light. What a life-saver!


As you can see from this picture, you take off the pad and the cover and put the little extender on. Then you have to cut the wire short and strip the insulation off and thread the bare wires through the prongs in the plastic plate and then clip it in the extender. The hardest part, at least for me, is drilling the holes for the brass cups that accept the prongs. It took a while to get it firmly connected and finally lit. But it is considerably better looking, and more realistic, than running the wires along the tape and wrapping the bare wires around those tiny brads.

Now onto doing the same thing on the walls for the two wall sockets that I have planned.


Wednesday, January 6, 2010

Lights, Part 2


I thought I would post another picture showing the electrical layout for the inside of the house.  I have laid out all the wire that I am going to and have on order two wall sockets and an adapter for the chandelier that will convert it from the light with a wire that I have to wrap the tiny wires around the small brads and allows easy removal of the lighting fixture.  You can see in the picture that I have sucessfully lighted the fixture, but it was a struggle.  I can't wait until I get them and move on to the fun part of decorating.  I also think that the adapter will make it less noticeable under the paint.

Tuesday, January 5, 2010

Lights!


I am pretty darn proud of myself, if I may be.  I successfully electrified my Storybook Cottage.  I am so excited.  This is the first time I have used the Cir-Kit Concept lighting system with the tape and tiny, tiny brads.  It took a little time to get used to putting those tiny nails into the tape and connecting the wires.  I must say it was very frustrating at first, but I finally got it.  The most difficult part for me was connecting the chandelier to the ceiling.  I also put a carriage light on the outside of the house, so along with getting the shingles on the front porch stained and getting the large flower box to the front; its moving along.

Friday, January 1, 2010

Some Finishing Touches

I put on some of the outside trim and it's looking good.  As you can see, I have put the undercoat for the roof so the shingles don't show through the white primer and I put on the top trim as well as finishing up the window trim.  I still have to put the copper flashing on, finish shingling the roof, and stain the shingles on the outside, but otherwise it's pretty finished. 

I decided to put a garden to the right of the house.  I drove by a car dealer of all places which had a beautiful patio outside.  It inspired me so much I took a picture on my cell phone of it and will use it a a guide to the little garden to the side of the Storybook Cottage.  I am looking forward to doing that.